Refinishing engineered wood flooring yourself might sound tricky, but with some planning and patience, it’s completely doable. I remember the first time I tackled a project like this. I was nervous at first, but by taking it step by step, the process became manageable. The key is to know what type of engineered wood you have, because not all engineered floors can be sanded heavily. Thinner veneers require a lighter touch, while thicker ones give you a little more room to work.
Start by clearing the room completely. Remove all furniture, rugs, and any baseboards if possible. A clean workspace makes the job easier and prevents dust from settling where you don’t want it. I like to cover nearby vents and doorways with plastic sheeting to contain the mess. Once the room is clear, give the floor a good sweep and mop. Any leftover dirt or grit can cause scratches when you start sanding, so it’s worth taking the time to get it spotless.

Before you sand, check the floor carefully for damage. Look for deep scratches, dents, or areas where the finish has completely worn off. Some floors only need a light buff and recoat, while others might need deeper sanding. If your floor has a thick enough top layer, you can sand down imperfections. If it’s very thin, focus instead on lightly abrading the surface just enough to let the new finish stick properly.
When it comes to sanding, less is more with engineered wood. I usually start with a fine grit sandpaper attached to a buffer rather than a heavy drum sander. A buffer is gentler and safer for engineered floors. Work slowly and move in consistent patterns to avoid uneven spots. It’s important to keep the buffer moving at all times to prevent gouges. After the first pass, I wipe everything down and check if another round is necessary.
Once sanding is finished, it’s time to clean up again. Vacuum thoroughly using a machine with a soft brush attachment. Then go over the floor with a damp microfiber cloth to catch any fine dust left behind. Dust is the enemy of a smooth finish. Even a tiny particle can cause bumps or imperfections later. I usually take a break at this point and let the room settle for an hour before starting the next step.
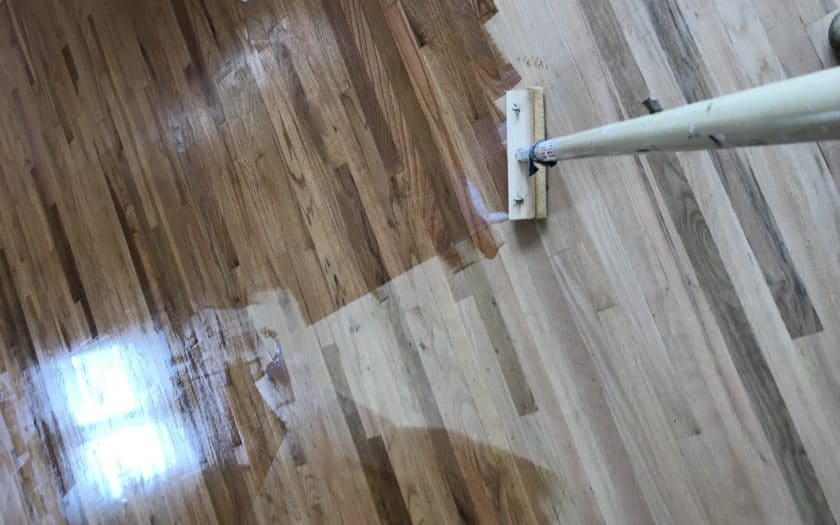
Now comes the fun part, applying the finish. There are a few options like water-based polyurethane, oil-based products, or specialty finishes for engineered wood. I prefer water-based because it dries faster and has less odor. Using a synthetic applicator pad, I work in small sections, keeping a wet edge to avoid lap marks. Thin, even coats are key. It is better to do multiple thin layers than one heavy, sticky one.

After the first coat dries, usually within a few hours, a light scuff sanding is necessary. I use a very fine grit sanding screen and a pole sander. The goal is not to remove the finish, just to knock down any raised grain or dust nibs. After sanding, vacuum and tack cloth again before applying the second coat. Depending on the product you choose, you might need two or three coats for the best protection and look.
Patience is important during drying times. I always wait at least the recommended number of hours before applying additional coats or walking on the surface. Humidity and temperature can change drying times, so it’s smart to plan ahead and avoid rushing. Even if it looks dry, it might still be soft underneath. Giving the finish enough time to cure properly will result in a harder, longer-lasting surface.

Once all coats are applied and fully cured, it’s time to reinstall baseboards and move furniture back carefully. I use felt pads under heavy items to protect the fresh finish. It’s tempting to rush this part, but being gentle now saves headaches later. I also avoid putting rugs back for at least a week to give the surface extra time to harden. A little patience at the end of the project helps the floor stay beautiful longer.
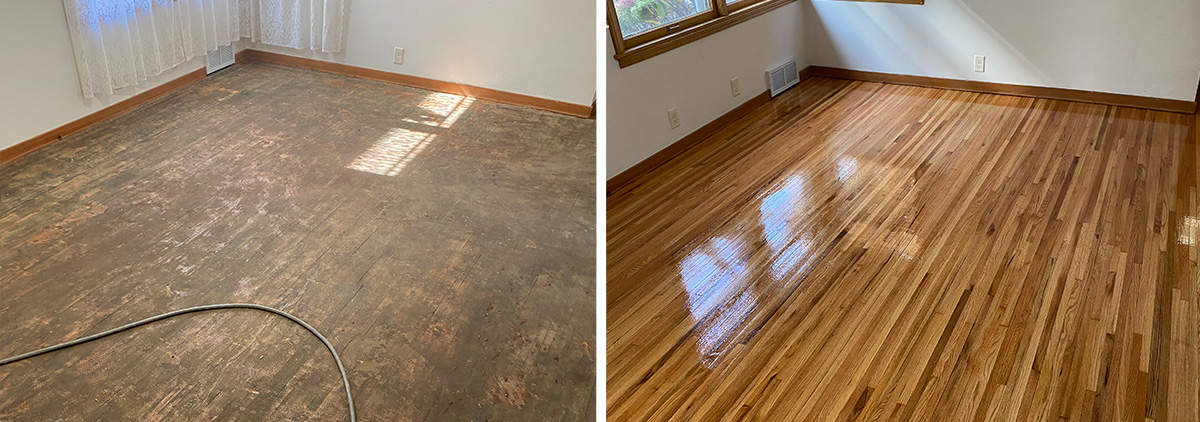
Refinishing engineered wood floors yourself is satisfying because you can bring fresh life to your home without hiring it out. It saves money and gives you control over the process. Every time I walk across a floor I refinished, it feels even better knowing I did the work with my own hands. With good preparation, the right tools, and a little care, you can get professional-looking results all by yourself.
:max_bytes(150000):strip_icc()/85-Hardwood-Floors-56a2fe035f9b58b7d0d002b4.jpg)
Home – Dave’s Hardwood Floor Refinishing
How To Refinish Hardwood Floors – DIY Home Improvement
Diy Refinish Hardwood Floors

How To Refinish Wood Floors With Gaps – Carpet Vidalondon
Luxury Vinyl Tile Gallery Vinyl Flooring Gallery RI MA
Related Posts: