Walking through the cobblestone streets of Seville five years ago, I fell in love with the intricate ceramic tiles adorning every kitchen I glimpsed through open doorways. The warm terracotta hues, hand-painted patterns, and weathered textures spoke to something deep within my soul. When I returned home to my bland suburban kitchen with its generic vinyl flooring, I knew exactly what needed to change. That trip sparked my obsession with Spanish style kitchen floor tiles and launched a renovation journey that would transform not just my cooking space but my entire approach to home design.
My research into authentic Spanish tile styles revealed a rich history dating back to Moorish influences in medieval Iberia. Traditional patterns include geometric azulejos, floral motifs, and intricate borders that tell stories through ceramic artistry. I learned that genuine Spanish tiles are often handmade, resulting in subtle variations in color and texture that create character impossible to replicate with machine-made alternatives. The most coveted pieces come from regions like Talavera and Seville, where centuries-old techniques produce tiles with unmatched authenticity and beauty.
Selecting the perfect tiles proved more challenging than anticipated as I discovered the vast range of options available in today’s market. Authentic imported Spanish tiles commanded premium prices, often exceeding $15 per square foot, while domestic reproductions offered similar aesthetics at half the cost. I spent weeks comparing samples, studying color variations under different lighting conditions, and researching manufacturers’ reputations. The decision ultimately came down to balancing my budget constraints with my desire for genuine Mediterranean character in my kitchen renovation.
Planning the layout required careful consideration of my kitchen’s existing architecture and traffic patterns. Spanish tile installations traditionally feature intricate borders, medallions, and geometric arrangements that demand precise measurements and professional installation expertise. I worked with a tile designer to create a pattern that would complement my oak cabinets while incorporating traditional elements like decorative borders around the island and subtle color transitions between work areas. The design process took months but resulted in a layout that felt both authentic and functional.

Preparation work revealed the importance of proper substrate preparation for successful Spanish tile installation. My existing vinyl flooring required complete removal, along with the underlying adhesive residue that had bonded to the concrete slab over decades. The installer emphasized that Spanish tiles, particularly handmade varieties, require perfectly level surfaces to prevent cracking and ensure even grout lines. We also installed radiant heating cables beneath the tiles, knowing that ceramic surfaces can feel cold during winter months in my climate.
Installation day brought both excitement and anxiety as I watched skilled craftsmen carefully position each handpainted tile according to our predetermined pattern. The process moved slowly due to the precision required for maintaining consistent spacing and alignment with the decorative borders. I observed how the installer checked each tile for defects and color variations, occasionally swapping pieces to achieve the best overall appearance. The traditional installation method using thick-set mortar provided superior adhesion compared to modern thin-set applications.

Grouting presented unique challenges due to the irregular surfaces and varied thicknesses inherent in handmade Spanish tiles. The installer used sanded grout in a warm beige tone that complemented the tile colors while providing necessary contrast to highlight individual pieces. Careful cleaning during the grouting process prevented haze buildup on the decorative surfaces, which could permanently dull the hand-painted glazes. The entire installation required three full days, significantly longer than standard ceramic tile projects due to the attention to detail required.
Sealing the completed installation became crucial for protecting both the tiles and grout from kitchen spills and stains. Spanish ceramic tiles often feature porous surfaces that readily absorb liquids, making proper sealing essential for long-term durability. I applied two coats of penetrating sealer specifically formulated for ceramic surfaces, allowing complete curing between applications. The sealer enhanced the tile colors while providing invisible protection that would preserve the beauty of my investment for years to come.

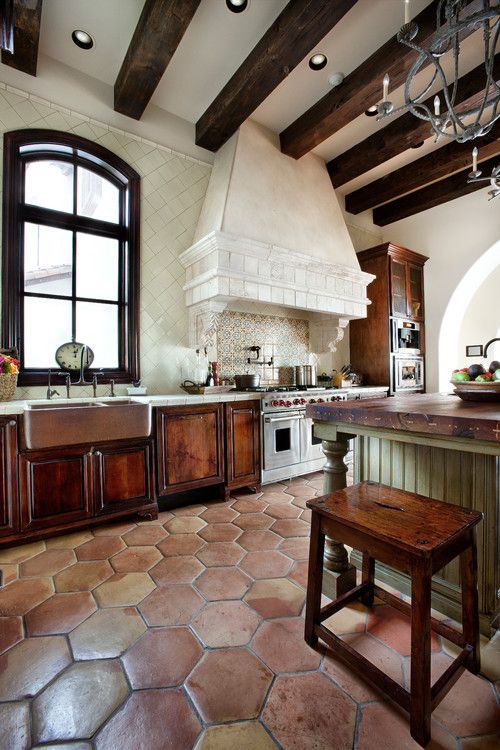
Living with Spanish style kitchen floor tiles has exceeded my expectations in both beauty and functionality. The warm colors create an inviting atmosphere that encourages family gatherings and extended cooking sessions. Maintenance requires regular sweeping and occasional mopping with pH-neutral cleaners to preserve the glazed surfaces. The textured surfaces provide excellent slip resistance even when wet, addressing safety concerns I had about ceramic flooring in a busy kitchen environment. Friends consistently comment on the authentic Mediterranean ambiance the tiles create.
My Spanish tile kitchen renovation cost approximately $8,000 for 200 square feet, including materials, installation, and sealing. While significantly more expensive than standard ceramic options, the investment transformed my kitchen into a space that brings daily joy and significantly increased my home’s value. The project taught me that authentic materials and skilled craftsmanship create results that machine-made alternatives simply cannot match. Every morning, stepping onto those beautiful tiles transports me back to those enchanting Spanish kitchens that first captured my imagination.

How do I distinguish between authentic Spanish tiles and mass-produced imitations?
Authentic Spanish tiles typically exhibit subtle variations in color, thickness, and surface texture that result from traditional handmaking processes. Look for slight irregularities in patterns, glazing variations, and the characteristic warmth that comes from natural clay bodies fired in traditional kilns. Genuine pieces often feature manufacturer stamps or signatures on the back, along with certificates of authenticity from established Spanish pottery regions. Mass-produced imitations tend to have perfectly uniform colors, patterns, and dimensions that lack the character of handcrafted originals.
What maintenance is required to keep Spanish style kitchen floor tiles looking their best?
Daily maintenance involves sweeping or vacuuming to remove abrasive particles that could scratch glazed surfaces over time. Weekly mopping with pH-neutral cleaners preserves the tile glazes while removing cooking residues and spills. Avoid acidic cleaners like vinegar or citrus-based products that can etch ceramic surfaces permanently. Annual resealing of grout lines prevents staining and moisture penetration, while periodic deep cleaning with specialized ceramic tile cleaners removes embedded dirt and restores original luster to the decorative surfaces.

Are Spanish kitchen floor tiles suitable for homes in cold climates?
Ceramic tiles conduct temperature readily, making them feel cold underfoot during winter months in northern climates. However, this characteristic also makes them ideal candidates for radiant floor heating systems that provide consistent warmth throughout the heating season. The thermal mass of ceramic tiles helps distribute heat evenly while reducing energy costs compared to forced-air systems. Many homeowners in cold regions successfully combine Spanish tiles with radiant heating to achieve both authentic Mediterranean aesthetics and year-round comfort.
What should I expect to pay for authentic Spanish kitchen floor tiles?
Pricing varies significantly based on tile origin, complexity of patterns, and import costs from Spanish manufacturers. Handmade tiles from renowned regions like Talavera or Seville typically range from $12-25 per square foot, while simpler patterns from smaller producers cost $8-15 per square foot. Installation costs add another $8-12 per square foot due to the precision required for proper alignment and pattern matching. Budget an additional 10-15% for waste and potential replacements, as handmade tiles occasionally arrive with defects or damage.

Can I install Spanish style kitchen floor tiles myself or do I need professional help?
While experienced DIY enthusiasts can tackle basic tile installations, Spanish style floors often require professional expertise due to complex patterns, decorative borders, and precise alignment requirements. Handmade tiles may have slight thickness variations that demand skilled adjustment during installation to maintain level surfaces. Pattern matching, border integration, and proper substrate preparation significantly impact final results. Unless you have extensive tiling experience, professional installation ensures optimal appearance and longevity of your significant investment in authentic Spanish ceramics.
How do Spanish kitchen floor tiles hold up to heavy foot traffic and kitchen activities?
Quality Spanish ceramic tiles demonstrate excellent durability when properly installed and maintained, easily withstanding decades of normal kitchen use. The firing process creates hard, dense surfaces that resist scratching from dropped utensils and normal foot traffic. However, handmade tiles may have softer glazes compared to industrial ceramics, making them more susceptible to damage from extreme impacts. Proper sealing and regular maintenance preserve both appearance and structural integrity, while the natural aging process often enhances the authentic Mediterranean character over time.

Related Posts: