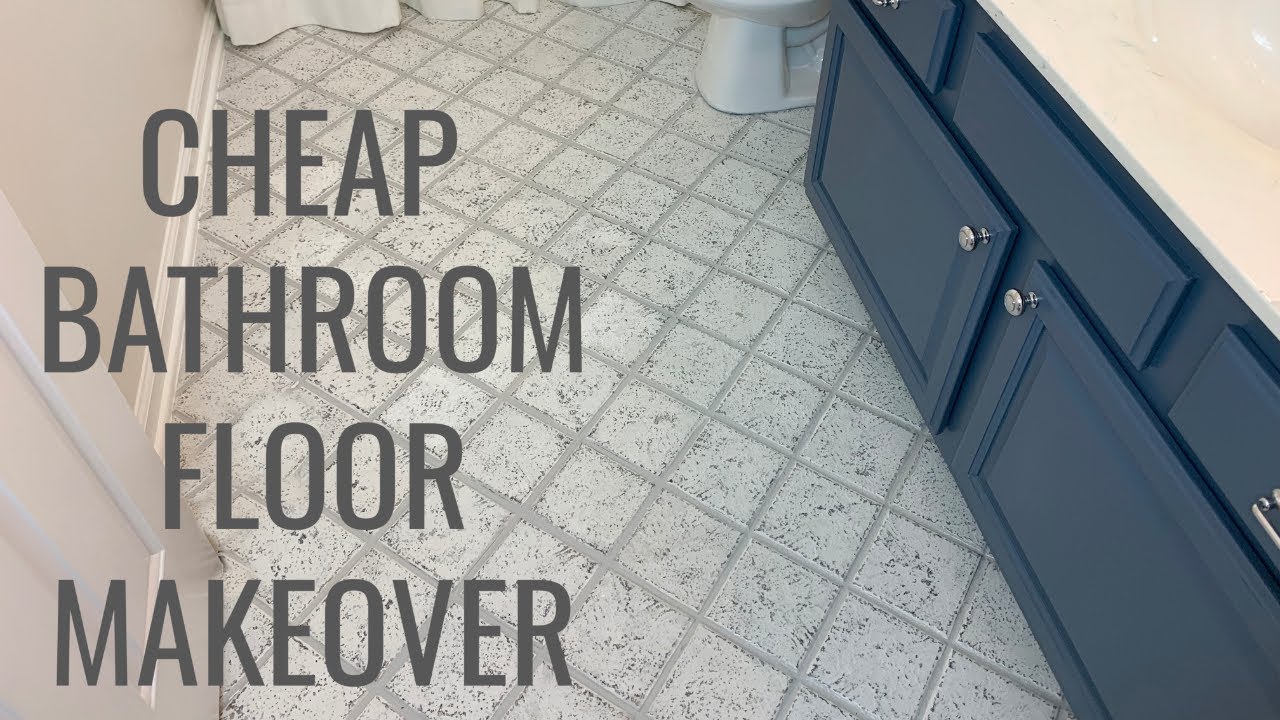
My bathroom floor makeover began as a frantic attempt to conceal the humiliating pink tile from the 1980s, which made my guest bathroom appear outdated and unwelcoming to visitors. After investigating numerous possibilities and economic limits, I learned that modern peel-and-stick tiles could transform any bathroom in a single weekend without professional installation or pricey gear. The experience showed me that big improvements do not necessarily necessitate extensive upgrades or contractor fees. Three months later, people continue to exclaim on the stunning transformation, which cost less than $200 and took only two days to finish successfully.
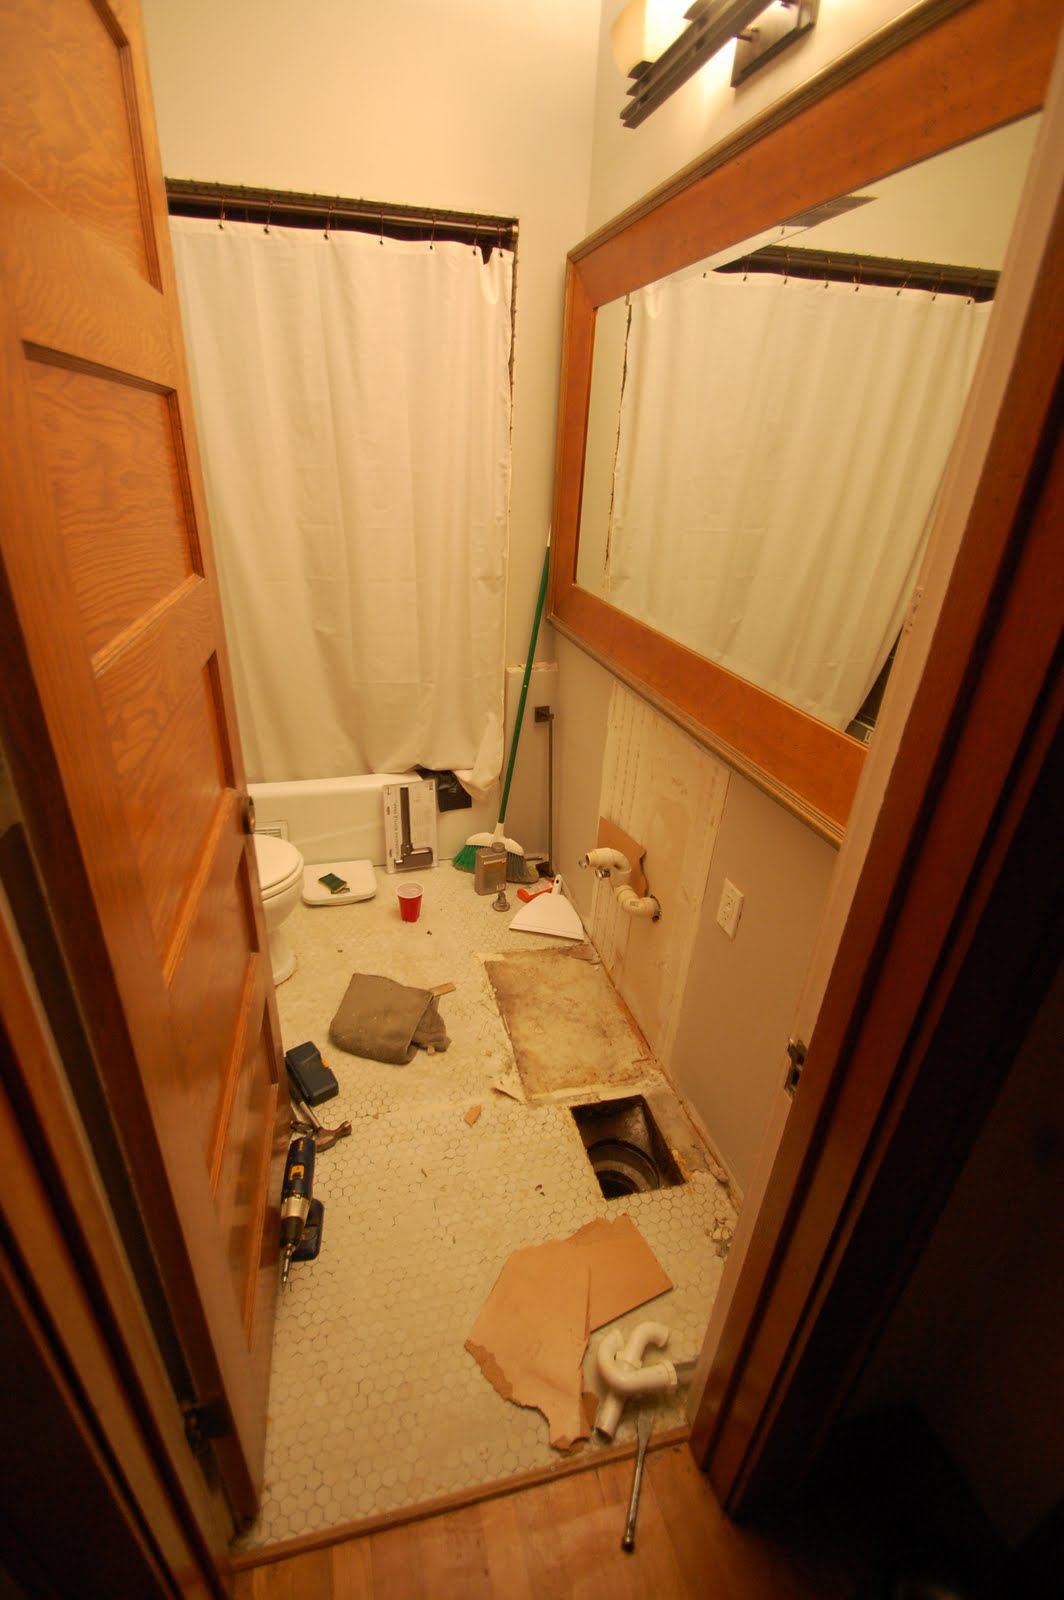
Preparation became my basis for success once I discovered that thorough surface cleaning and small repairs affect the longevity and beauty of any floor makeover. I spent Saturday morning removing all furniture, extensively cleaning using degreasing products, and fixing small gaps with spackling solution to create smooth surfaces. The current tile required a thorough cleaning to remove soap scum and old adhesive residue that could interfere with new tile adherence. This time-consuming but necessary technique ensured that my peel-and-stick tiles bonded properly and maintained their beauty during years of daily use and moisture exposure.

Peel-and-stick vinyl tiles impressed me with their realistic appearance and simple installation technique, which required no specific expertise or expensive gear to achieve excellent results. I chose luxury vinyl tiles that looked like actual stone, with slight color variations and textured surfaces that successfully conceal filth and wear patterns. The adhesive backing formed strong bindings with my clean, prepared surface while allowing for repositioning within the first few minutes of installation. Each 12-inch square tile was swiftly installed with light pressure, resulting in flawless coverage that appeared costly despite the low cost and simple installation process.
Layout planning avoided costly blunders and produced professional-looking results, so visitors assumed contractor installation and considerable renovation costs across the bathroom area. I began with chalk lines identifying the room’s central point and worked outward in a grid pattern to preserve straight lines and consistent spacing. Measuring carefully prevented small slivers on walls while providing symmetrical borders that visually improved the room’s proportions. The meticulous technique took longer initially, but it minimized the need for repairs or tile replacement, which may have jeopardized the project’s success and look.

Cutting techniques became necessary for installing tiles around the toilet base, vanity legs, and other impediments that required exact measurements and meticulous execution. I used a sharp utility knife and a metal straightedge to make clean cuts through the vinyl sheet with no cracks or rough edges. Templates made of cardboard aided in creating correct curves around the toilet flange and other odd shapes that normal measurements could not accommodate. Patience during this phase resulted in tight fitting that looked professional while minimizing gaps where moisture could enter and cause adhesion issues over time.
Color coordination altered my bathroom’s entire style by choosing tile hues that suited existing fixtures while providing the bright, modern mood I desired. I chose cream and gray tiles in a subtle pattern to make the little space appear larger while concealing minor flaws in the subfloor. The neutral hue allowed my old white fixtures and colorful towels to blend in without clashing or looking dated. This careful approach resulted in a coherent design that appears intended rather than a hasty repair or temporary response to cosmetic issues.

Finishing touches raised the renovation from acceptable to remarkable by paying close attention to details that result in polished, professional appearances throughout the bathroom. I built new baseboards and quarter-round molding to fill expansion gaps and create smooth transitions between floor and wall surfaces. Fresh caulk around the toilet base and tub surround finished the waterproof seal while keeping the area tidy. These minor improvements cost little expense but dramatically increased the whole transformation’s impact and perceived value among family members and guests.
Maintenance procedures were devised to protect my investment while keeping the new floor appearing fresh and clean despite everyday wear and moisture exposure challenges. Weekly mopping with pH-neutral cleansers keeps the tile’s appearance intact without destroying the glue or surface finish, which keeps the flooring appearing new. Spills should be cleaned up right once to avoid discoloration, and regular inspections identify any loose edges that need to be addressed before they become bigger problems. The low-maintenance features make this solution ideal for busy households where intensive cleaning procedures are neither practicable nor sustainable in the long run.
Cost study demonstrated excellent value when compared to standard restoration methods that necessitate skilled installation, costly materials, and weeks of disruption during construction. My entire renovation cost $180 in materials, including tiles, tools, and finishing supplies, resulting in a transformation worth thousands in perceived value and everyday enjoyment. The two-day timeline ensured minimum interruption to family routines while producing results that appear pricey and professionally installed. This cost-effective strategy demonstrates that substantial improvements do not necessitate significant financial commitments or lengthy remodeling periods to yield satisfactory outcomes.
Long-term satisfaction continues to exceed my expectations, as the floor retains its appearance and performance after eight months of family use and guest traffic. The alteration significantly changed my attitude about the bathroom space, making it a room I’m proud to show visitors rather than embarrassed to use. The achievement boosted confidence in pursuing other home repair tasks with similar cost-effective ideas and DIY methods. Friends frequently ask for help on their own bathroom makeovers, and I happily recommend this low-cost option that anybody can successfully complete with basic equipment and a weekend.

How long do peel-and-stick bathroom floor tiles usually last?
Quality peel-and-stick vinyl tiles can last 5-10 years in bathroom environments with correct installation and care, according to my experience with various applications. Surface preparation quality, moisture control, and using wet area-rated tiles are all important elements in determining lifetime. My bathroom floor is still in fantastic condition after eight months of regular family use with no lifting or wear issues. Cheaper tiles may fail sooner, so investing in respected brands with strong adhesive systems pays off over time. Regular maintenance and early repair to any lifting edges considerably increase the longevity.
Can I install peel-and-stick tiles over my existing bathroom flooring?
Most existing hard surfaces function well as peel-and-stick tile substrates if properly cleaned and prepped prior to installation. I successfully installed over old ceramic tile after thoroughly cleaning and filling grout lines to create smooth surfaces. Vinyl flooring, linoleum, and sealed concrete all perform well as base materials with adequate preparation. Avoid installing over carpet, loose tiles, or damaged surfaces that may affect adhesion quality. Professional evaluation may be required for suspect substrates in order to ensure successful long-term performance and avoid costly failure.

What tools and supplies will I need for a bathroom floor makeover?
For comfortable installation work, basic instruments include a utility knife, metal straightedge, measuring tape, chalk line, and knee pads. I also used a hair drier to warm the tiles in chilly weather and a roller to ensure perfect adhesion. Cleaning supplies, spackling compound, and new baseboards round out the materials list for most tasks. If you don’t already have basic hand tools, the total outlay is usually less than $50. Most households have everything they need except specialty things like chalk lines, making this a simple DIY project for newbies with modest tool collections.
How should I address moisture and humidity concerns in bathroom installations?
Proper ventilation and waterproof sealing around fixtures minimize moisture buildup, which can damage tile adhesion in bathroom environments over time. I made sure my exhaust fan worked properly and applied extra caulk around the toilet base and tub edges for comprehensive moisture protection. Allow surfaces to completely dry before installation, and avoid working in high humidity areas wherever possible. Moisture-resistant adhesives are used in high-quality peel-and-stick bathroom tiles. Most moisture-related issues can be avoided by maintaining caulk seals on a regular basis and responding quickly to any water incursion.

How can I remove peel-and-stick tiles so I may change them later?
Heat softens the adhesive, allowing for easy removal without damaging the substrate surface in most circumstances. To cleanly remove tiles, I used a hair dryer to warm them before gently lifting corners with a putty knife. Work slowly to avoid ripping, which could leave adhesive residue and necessitate further cleanup attempts. Adhesive removers can assist remove tenacious residue, but with correct technique, high-quality tiles can frequently come off clean. Peel-and-stick tiles are a fantastic solution for renters or homeowners who want to change their design on a regular basis without making long-term commitments.
How can I achieve straight lines and professional-looking installation results?
Careful layout design with chalk lines and precise dimensions lays the groundwork for professional-looking installations that appear expensive despite DIY approaches. To preserve harmony and proportion across the space, I start in the center of the room and go outward. Using spacers or leaving constant spaces between tiles ensures a uniform appearance while still allowing for expansion and contraction. Allow time for dry-fitting before removing the adhesive backing to ensure proper placement and make adjustments. Patience during layout avoids mistakes that affect the final appearance and necessitate costly adjustments or tile replacement to attain good results.
How to Remove Tile Flooring Tile removal, Removing bathroom tile, Tile floor

Beautiful Bathroom Floors from DIY Network DIY

Shower tile ideas. Shower Walls/niche- 3×6 semplice white subway. Floor- Arabescato Carrara Hexa

Inexpensive DIY Modern Master Bathroom Makeover

Related Posts: