I was exhausted with having to replace my kitchen flooring every few years, so I was suspicious when my contractor proposed painted concrete floors. My previous vinyl had peeled, my laminate had twisted due to spills, and my ceramic tiles had broken beneath heavy appliances. Concrete looked too industrial and frigid for a kitchen. However, after researching the benefits and viewing magnificent specimens online, I decided to take the plunge. That decision transformed my kitchen into a sleek, sophisticated room that guests frequently compliment.
My current flooring had to be removed to expose the concrete slab beneath it as part of the preparation procedure. My contractor indicated that the concrete had to be thoroughly cleaned, repaired, and prepared before staining could begin. To get a smooth, level surface, we patched any gaps and ground down any high places. The cleaning process included degreasing and removing any remaining adhesive from earlier flooring installations. This foundation work took two full days but was critical to obtaining the gorgeous, uniform finish I had envisioned.

Choosing the correct stain color turned out to be a thrilling creative process that I had not anticipated. Acid-based stains cause chemical interactions with concrete, resulting in rich, varied hues that penetrate deeply into the surface. I chose a warm golden tone that matched my oak cabinets well. Water-based stains produce more consistent, uniform hues, but lack the organic depth I sought. We tested numerous tiny areas to see how the stain would react to my particular concrete, as each slab reacts differently to the chemical process.
The application day was exciting to witness as the concrete changed before my eyes. My contractor applied the acid stain with a pump sprayer, working in small parts to ensure even coverage. The chemical reaction occurred instantly, resulting in magnificent mottled patterns and color variations that resembled natural stone. After the stain had worked for many hours, we neutralized the surface and properly cleaned off any residue. The concrete had to dry for 24 hours before we could seal it, building suspense for the end product.

Sealing proved to be the most important step in kitchen functionality and longevity. We used many layers of a high-quality polyurethane sealer intended exclusively for high-traffic areas. The sealer not only protects against stains and moisture, but it also adds a glossy surface that makes cleaning easier. We lightly sanded the surface in between coats to guarantee adequate adherence. The end product was a gorgeous floor that also had practical benefits such as easy cleaning and excellent longevity for my busy kitchen.
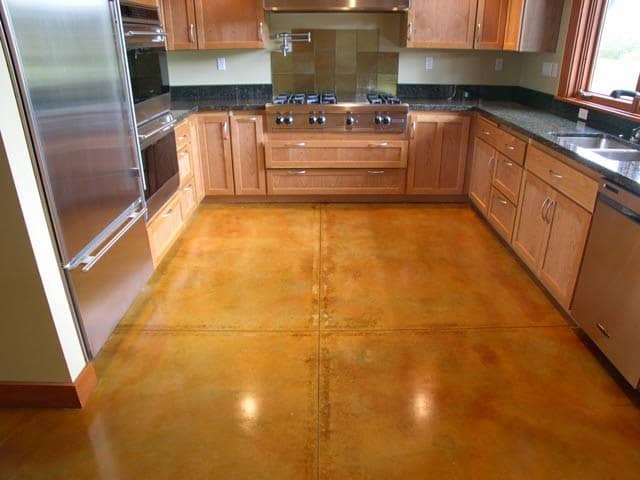
The change outperformed my expectations in terms of both appearance and functionality. My kitchen now has a refined, premium appearance that complements both modern and classic design aspects. The warm amber tones add depth and visual appeal while being neutral enough to work with different décor styles. Friends frequently mistake it for pricey natural stone, until I clarify that it is tinted concrete. The seamless surface removes grout lines that can trap dirt and bacteria, making it more sanitary than standard tile alternatives.

Daily upkeep could not be easier, which has been a game changer for my hectic lifestyle. To eliminate debris, I sweep or vacuum daily and mop once a week with a pH-neutral cleaner. Spills, even red wine and tomato sauce, wipe up readily without leaving a stain. The sealed surface protects against scratches from fallen utensils and heavy equipment. Unlike other flooring options, I am not concerned about water damage from dishwasher leaks or excessive wetness. This flooring’s endurance means I’ll never have to replace it again.
The cost reductions over high-end alternatives made this undertaking extremely rewarding. Natural stone or premium hardwood would have cost three times as much and required substantially more maintenance. The installation took only four days from start to finish, which reduced kitchen downtime. This update significantly boosted the value of my property, and potential buyers frequently complimented me on the lovely flooring during showings. The return on investment has already paid dividends in terms of satisfaction and property value appreciation.

The most surprising aspect of living with stained concrete floors in my kitchen was the comfort factor. I was concerned about the surface being chilly and hard, but thermal mass actually helps regulate temperature. In the summer, the floors remain cool and comfortable, and radiant heating can be installed underneath if required. Standing for long cooking sessions causes no more tiredness than other hard surfaces. Area rugs in strategic locations give comfort without jeopardizing the clean, modern style I enjoy.
After two years of daily use, I have had nothing except excellent experiences with stained concrete kitchen floors. This flooring option is ideal for busy kitchens due to its beauty, durability, and ease of upkeep. I recommend this improvement to anyone planning a kitchen renovation, particularly those who are tired of replacing flooring every few years. The investment pays for itself by lowering maintenance expenses and increasing house value. If you want a one-of-a-kind, functional, and visually appealing kitchen floor, stained concrete is a great option for your next project.

How long does it take to install stained concrete floors in the kitchen?
The entire procedure usually takes 4-6 days from start to finish, depending on the size of your kitchen and the current conditions. Day one entails removing the old flooring and prepping the concrete surface. Day two consists of cleaning, repairs, and final surface preparation. Stain application occurs on day three, followed by neutralization and cleaning. Sealing takes two days, with many coats and cure time in between treatments. Weather and humidity can make drying times longer, so plan your kitchen renovation timeline accordingly.
Is stained concrete flooring appropriate for kitchens with high foot traffic and appliance use?
Properly sealed stained concrete floors are incredibly durable and ideal for high-traffic kitchens. The sealer forms a protective layer against scratches, dents, and stains caused by normal culinary activity. Heavy appliances will not damage the surface, as they would with softer flooring materials. The concrete substrate offers outstanding strength and durability. With careful care, these floors can last for decades without being replaced. Many industrial kitchens use concrete flooring because it is long-lasting and requires minimal upkeep.

What are the regular maintenance needs for stained concrete kitchen floors?
Daily maintenance consists of sweeping or vacuuming to remove debris, followed by damp mopping with pH-neutral detergents. Avoid using acidic or abrasive cleansers, since these can damage the sealer. Resealing every 2-3 years ensures excellent protection and beauty, but high-traffic areas may require care sooner. To avoid stains, spills should be cleaned up right away. The sealed surface is resistant to most stains, but regular cleaning assures long-term attractiveness. Overall, maintenance is substantially less demanding than genuine stone, hardwood, or grouted tile.
How much should I spend on stained concrete floors in an average-sized kitchen?
Prices vary depending on region and complexity, but expert installation should cost between $3 and $8 per square foot. A standard 200-square-foot kitchen costs between $600 and $1600 altogether. Surface preparation needs, stain intricacy, sealer quality, and local labor prices all have an impact on pricing. This is a significant savings over natural stone ($8-15/sq ft) and quality hardwood ($6-12/sq ft). DIY installation can save money, but it needs specific knowledge and equipment. Professional installation provides correct preparation and sealing, resulting in long-term success.

Can stained concrete floors be placed over existing kitchen flooring?
Generally, previous flooring must be removed to allow proper stain penetration to the concrete substrate beneath. Stains require direct contact with concrete to cause the chemical reaction that results in color. Installing over existing floors would necessitate a concrete overlay system, which increases expense and complexity. Some situations permit staining over very thin, well-bonded materials, but removal is usually suggested. The preparation work is critical to producing the stunning, long-lasting results that make stained concrete floors so appealing.
Will stained concrete floors feel chilly and uncomfortable in my kitchen during the winter?
The thermal mass of concrete helps regulate temperature, allowing it to remain generally pleasant throughout the year. While initially chilly to the touch, the surface quickly adapts to ambient temperature and feels comparable to tile flooring. Area rugs in critical standing locations bring warmth and comfort to food preparation. Radiant heating systems can be put beneath concrete to provide optimal comfort in colder climates. Many homeowners find the temperature difference to be insignificant when compared to other hard flooring surfaces, and they benefit from improved durability and ease of maintenance.

Epoxy Flooring Kitchen Epoxy floor basement, Epoxy floor, Flooring

Home Remodeling Improvement -15 Kitchen Design Ideas Under $10,000 – HubPages
Stained concrete floors kitchen Using a black-pigmented base brought the semi-transparent

gray concrete floor kitchen modern with silver pendant jacksonville heating and cooling com

How to Repair Cracks In a Concrete Floor
:max_bytes(150000):strip_icc()/stained-kitchen-1-56a2fc713df78cf7727b6a02.jpg)
Stained Concrete Floor Ideas, Pictures, Remodel and Decor

Pin on Best deck stain

Related Posts: